We’ve all been there: wanting to capture the moment but the lighting conditions are terrible or you’re stuck with an angle that is not the greatest. I’ve learned to shoot anyway, you’ll be surprised how much you can salvage in an editing program like Lightroom or Photoshop.
There are all kinds of reasons why your photo can be not-so-great. For this post I’m going to focus on fixing exposure, correcting perspective and removing unwanted objects and clean up your photo. Each with an example from my photo library.
Fixing exposure
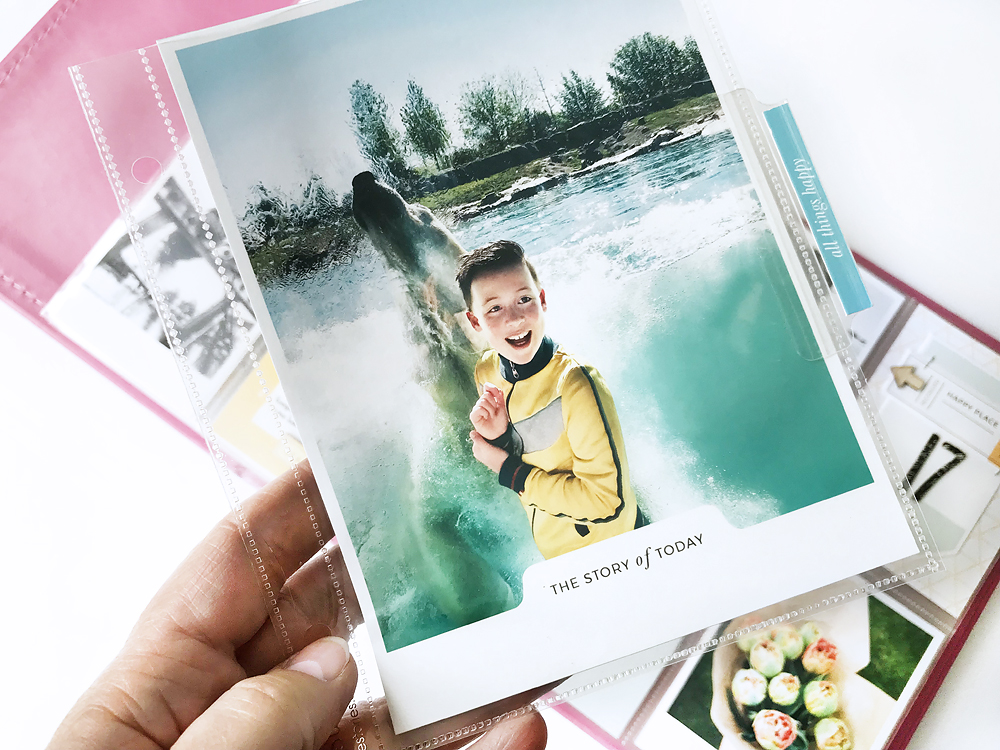
In this example the lighting was terrible but I had to move quick because that polar bear would not pose for me… I took some lucky shots, I underexposed a bit on purpose as to not blow out the highlights too much but had not anticipated the photo would come out this dark. I imported the image into Lightroom. Yes, you can import JPG’s into Lightroom it’s not just for RAW images!
These are the most important steps I used to get to the final image:
- Increased the overall exposure but be careful not to overexpose the lighter parts, we’ll tackle the parts that are still too dark next.
- With an adjustment brush I increased exposure and lightened up the shadows even more on the parts that where still too dark.
- Sharpened the image. The masking will make sure not only the edges will be sharpened and not the noise in -for instance- the sky.
- Darkened the sky using the graduated filter.
- Color corrected the underwater part using the adjustment brush.
- Increased the blacks a bit to give it a bit more punch.
Have a look at the video where I edit my photo:
You can see I edit as I go, tweaking and adjusting along the way. Make sure to use the adjustment brush wherever you can, this way you can edit just those parts of your image that need it. After this, I imported my edited photo to Photoshop where I removed some reflections and waterspots from the window, see some of those techniques below!
Of course, every lighting situation is different and my edits will not be exactly what you need for your underexposed images but hopefully these tips will get you into the right direction! Below the final photo as I used it in my 6×8 album. Is it perfect? Probably not. But I think it’s looking a whole lot better than the original and I’m happy it’s in the album.

Correcting perspective for straight lines
If you photograph buildings or interiors a lot, you probably have encountered this: lines that are not straight! I like my lines straight (most of the times) I think my photos look better that way, especially when in the pockets in my project life albums. There’s an easy way both in Lightroom and Photoshop to correct this.

In the next video I show you the my go-to way for fixing the perspective in Lightroom:
These are the most important things to remember when using the transform tool in Lightroom:
- Start with the ‘upright tool’ it’s the most accurate for most situations in my opinion.
- Experiment with the other perspective tools as well, it’s easy to revert to previous states if it’s not looking good.
- You have 2 guides to correct the horizontal and 2 guides to correct vertical lines, use both for it to work!
- Use the ‘scale slider’ to recover some of your canvas.
You can see in the video that this created some white parts in the upper corners, you can either cut those out or, if they are important for the photo (and aspect ratio!), use the techniques below to fill them in using cloning in Photoshop.
Removing unwanted objects
When you are taking about your photos in public places there’s no way to avoid it: if it’s not light poles or trashcans a stranger walks in your frame (how dare they!) It can really distract from your subject or the overall feel and mood of your photo. I almost always use Photoshop for editing out larger or more complicated objects from my photos. I think it does a better job than Lightroom for this. I do, however use Lightroom for smaller objects or blemishes.

In the next 2 videos I’ll show you a couple of examples on how I edit out distractions from my photos.
Some tips when editing out objects in Photoshop:
- Always work on a copy of your layer, so you can revert to a previous state of your photo.
- Combine the cloning tool and spot healing tool for best results.
- Remember to vary the hardness of your brush: in most cases a softer brush looks most natural but when editing next to objects with a more defined edge, a harder brush is often a better choice.
- Zoom in and out so you can see if what you’re doing looks good.
- Experiment!
I hope these three ways to tackle your not-so-great-photos has helped you to see the potential within your own photos that you have on your phone or computer. Pick one that you love but is technically flawed or has other problems, open it in Lightroom or Photoshop and see what you can do with it. Good luck!
Once you have a chance to read the article I’d love to hear your thoughts on the topic.
What are your wins and struggles using these techniques? And what’s your favorite software when it comes to photo editing?


 No products in the cart.
Excellent tips Leontien. I will def keep those videos for future reference. I too have had LR for years but never did that much adjustment work. It’s one of my favorite programs and it’s so good to see tutorials designed for jpeg scrappers. I’m a strictly iPhone photographer.
Wow the polar bear photo looks amazing! The colour of the water and everything, just looks like you shot it that way! Thanks for the neat tips, I’ve had LR for years but don’t think I’ve ever used adjustments with brushes, so will be trying out these techniques <3
Thank you so much for the tips/tutorials! I recently subscribed to Adobe Creative Cloud (after being a long-time Photoshop user) and have access to Lightroom – just don’t know how to use it!
Thanks Abby! It works a bit different than Photoshop but hopefully you’l end up loving it.